Tuesday, May 25, 2010

Day 4: The First Feeding

This post represents DAY 4 of the day-by-day documentary of the gardening adventures of a newly-wed first-time gardening couple. They are not only first-time bucket gardeners but first-time any kind of gardeners. The details of their successes and failures will be communicated here so you can follow along with your garden - if you wish. To see links to each of the "days" click here.

Day 4: The First Feeding

My alarm woke me up and I immediately ran to our plants to check on them. Yay! They looked well hydrated and ready for their first feeding. I put them out in the sun - YES - a sunny day - and got ready for work while I read the assembly instructions for our sprayer. Got a little frustrated - put it together a few times to seal all the right places but finally got it working. I tested the sprayer with water before I used the nutrient to make sure I had it figured out. Phew - it worked on my third try! Mmmm I'm probably going to be late to work - oh well - they'll understand - I was feeding.

Because I didn't have very many plants to spray I mixed a minimal amount of nutrient. I used 32 oz (1/4 gallon) of water and should have used 1/4 Tbsp of nutrient. I'm sitting here recording this and realizing that I fed my plants too strongly but this is a place to share successes and failures right? So I'm not very good at conversions first thing in the morning and I used 1/2 Tbsp of nutrient instead of 1/4. Forgive me please! Ah! Bah! I'm frustrated! Luckily my plants looked great this evening so I think they will survive. I will make sure never to make this mistake again and it would make me feel much better if you make sure not to make my mistake. Thanks! {IMPORTANT EDIT AS OF 5/27/2010 - THESE PLANTS WERE NOT OVERFED HOORAY! HOWEVER I HAVE LEFT THIS DOCUMENTARY HERE BECAUSE IT ILLUSTRATES AN IMPORTANT POINT - enough of the capital letters already sheesh - ok so TRANSPLANTS should be fed with a 2 Tbsp per 1 gallon of water ratio but SEEDLINGS should be fed with a 1 Tbsp per 1 gallon of water ratio. Just follow Ted's nutrient application carefully ok!}

This picture is not quite correct because I have shown a 1/2 Tbsp measure - IT SHOULD BE 1/4 for 32 oz of water... {NO IT SHOULDN'T - 1/2 Tbsp is correct for TRANSPLANTS!}
 

Here is what my water looked like after everything was mixed. Yours should look a lot lighter because once again I doubled the nutrient..... grrrrrrrr.... {NOPE - YOURS SHOULD LOOK EXACTLY LIKE THIS IF YOU ARE FEEDING TRANSPLANTS!}


Using this kitchen measurer was genius {just soap it really really good afterward because it stinks - I think I will buy one to use just for the garden so I don't have to worry about cross contamination}. It made it so super easy to mix and to transfer into my sprayer. Once the nutrient was inside the sprayer and the sprayer was pressurized it was feeding time! I sprayed the tops and bottoms of the leaves on my plants. I don't think this is an exact science. The sprayer does a great job spraying the nutrient everywhere. Hooray for the sprayer!


I used about 1 cup of nutrient to spray all of my plants. Here is what was left when I was done.

AND


Here are my forgiving {NOT} over-nutriented plants after their first feeding.
I also spent some time today pondering my secondary planting desires and the rest of the primary plants I want... I started designing my garden schematic and will be super relieved when it is finished and I can share it with ya'll. I also did a bunch of research online about companion plants and plants that ward of bad insects and attract beneficial insects. It was fun! Seriously!

Oh, and when I got home from work I watered my plants again in the kitchen sink. If I could do today over, I would have watered them in the morning as well as in the evening... Oh well - you can't get everything perfect the first time.

Monday, May 24, 2010

Day 3: Our First Primaries

This post represents DAY 3 of the day-by-day documentary of the gardening adventures of a newly-wed first-time gardening couple. They are not only first-time bucket gardeners but first-time any kind of gardeners. The details of their successes and failures will be communicated here so you can follow along with your garden - if you wish. To see links to each of the "days" click here.

Day 3: Our First Primaries

After thinking about our plants all day at work we hurried to our local nursery to purchase our first batch of primary plants. We decided to buy small starts rather than growing them so we could speed things up. Cost: $14

Our cast of characters included:


We arrived at the nursery 10 minutes before it closed - Bah! We hurried really really fast to find some yummy plants to start with. The main thing we looked for was small plants - small plants will grow quicker once planted in our bag and they will adapt to the new environment in the bag better than a larger plant. Indeterminate tomatoes were a must for us. Really that's all. Maybe we'll get better at the shopping thing once we get some more experience.

When we got home I watered the plants thoroughly to prepare them for their feeding in the morning. Before spraying your plants with nutrient it is crucial that they are well hydrated. The top soil around the plants felt moist but when I put my finger in the pot and felt the dirt in the bottom it was fairly dry - that is how I knew I needed to water these babies. To water my plants I ran the kitchen sink sprayer on the soil until a puddle of water formed then left them in the sink for a few minutes to let the water drip out of the bottom. I tucked them in a safe place inside our home for the evening - we've been experiencing very cold evenings {even at the end of May} here in Utah so I'm going to keep them warm inside as long as possible. Hopefully we have plenty of sunlight tomorrow!

Note: For day 4 you will need your nutrient bottle and sprayer and you may want to set your alarm a little earlier than normal tonight. Sweet garden dreams!

*Today I also printed off a copy of the Garden Master's nutrient application instructions for quick reference. You can do the same by clicking here.

Sunday, May 23, 2010

Day 2: Rest

This post represents DAY 2 of the day-by-day documentary of the gardening adventures of a newly-wed first-time gardening couple. They are not only first-time bucket gardeners but first-time any kind of gardeners. The details of their successes and failures will be communicated here so you can follow along with your garden - if you wish. To see links to each of the "days" click here.

Day 2: Rest

Sunday = no gardening today. Just daydreaming about our garden's future.

Saturday, May 22, 2010

Day 1: The Installation

This post represents DAY 1 of the day-by-day documentary of the gardening adventures of a newly-wed first-time gardening couple. They are not only first-time bucket gardeners but first-time any kind of gardeners. The details of their successes and failures will be communicated here so you can follow along with your garden - if you wish. To see links to each of the "days" click here.

Day 1: The Installation

Today it began. That's right folks. We are officially the proud owners of a bucket garden. She began her life May 22, 2010 at 6:38 PM. She is 4'x8' and weighs a ton. We have been lucky to spend almost no time getting ready for her. Here is the step by step for how she was formed.

1) We ordered a 4'x8' garden kit from the garden master AND one jar of nutrient (click here to go to the garden master's website) - cost approx $190.

2) We selected the location for our garden. This was somewhat tricky for us because we are college students living in a basement apartment. Lucky for us, the bucket garden can grow anywhere - on wood, concrete, dirt - you name it. As long as it has exposure to sunlight it will work. Click here for a getting started guide from the Garden Master that has more information on site selection.

3) We got super super super excited.

4) We scheduled an installation with the Janis family. They came up to Utah from Phoenix for a whole week to install gardens for us unlucky folk who live so far away from the action in AZ.

5) We went to our local home improvement store and purchased a sprayer like this. We also purchased some RoundUp and ran to the grocery store for some apple cider vinegar. One Tbsp of apple cider vinegar was added to our 1 gallon of RoundUp and sprayed on the weeds currently occupying the space for our garden. Cost $20.

6) We spent our Friday lunch break picking up a TON of sand. Literally one ton. We got our sand from Geneva Rock. They charged us $40 for as much sand as our truck could hold. The sand you get needs to be a coarse pre-washed concrete or gravel sand w/ less than 15% clay content. It is important that the sand is coarse - you don't want stuff you would want to stick your feet in. For additional info on the sand you need click here.

7) We helped the Janis' install our garden. They had everything we needed that didn't come in the kit. We felt so super lucky to have their help! Here we are wrapping up for the night. Isn't she fabulous - all ready to grow!


Then we left our new garden for the evening to resume our life. I think that will be the greatest thing about this garden, we will enjoy thinking about her while we are living our life rather than allowing her to control our life.

Wednesday, May 19, 2010

Interactive {Andi's comment}

Good news everyone! We received this in our email inbox today -

Andi has left a new comment on your post "Planting":
This is great information, thank you for your blog! I wanted to know if you could tell us what make good primary plants, secondary plants, etc.. I am new to gardening, so I appreciate any info you can give me. Thanks!


Hooray! Andi you made our day! We are so excited there is someone out there who thinks we are providing "great information" - it really motivates us to keep this project growing.

Great great questions! Hopefully the following information will help.

First of all I would like to talk about two key characteristics that distinguish a primary plant from a secondary plant.

1) A primary plant provides produce all season long (i.e. when you pick the produce you aren't picking the entire plant). The opposite is true for a secondary plant. When a secondary plant reaches a certain size, you harvest it, and by harvesting it you harvest the whole plant.
2) A primary plant typically takes up a lot of space and provides shade and sun protection for secondary plants. Again, the opposite is true for a secondary plant, they usually take up less space.

The perfect examples for this are a tomato plant and a carrot "plant". When you pick a tomato, you just pick a tomato - more tomatoes will grow from the plant which you picked a tomato from. When you pick a carrot, you pick the entire carrot "plant" and no more carrots will grow. Unfortunately these distinctions are not so clear cut for every type of plant - but they are good rules of thumb to follow.

Here are examples of plants we think would make great PRIMARY PLANTS:

Tomato
Pepper
Cabbage (can plant one cabbage or two at a diagonal)
Squash
Melons
Beans/Peas (4 planted in a row down center of bag - however, these also can work as secondaries)
Cucumber
Eggplant
Asparagus (don't get to excited - it will take a lot of years to get a high yielding crop from this plant - your first year you'll get 1, second year you'll get 2, etc.)

Here are examples of plants we think would make great SECONDARY PLANTS:

Carrot
Radish
Herbs
Beans/Peas
Spinach
Lettuce
Kale
Beet
Broccoli
Celery
Brussel sprouts
Onion
Cauliflower

I underlined the word think above because right now this information is an educated hypothesis based on how we've interpreted Ted's teaching. This is our first year experimenting and we anticipate gaining lots of knowledge.

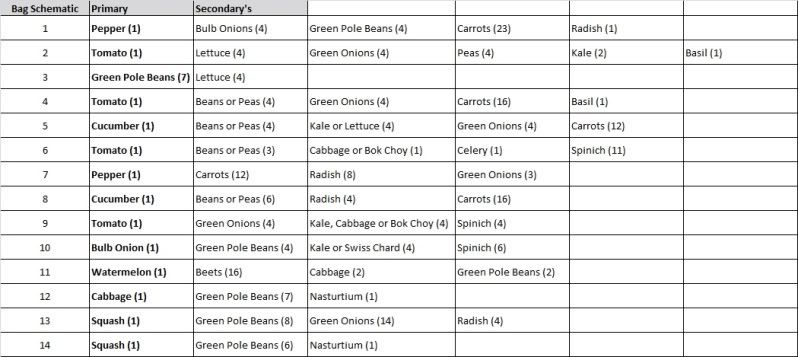
Here is a sample planting schedule we put together for 14 bags for one of our gardens.

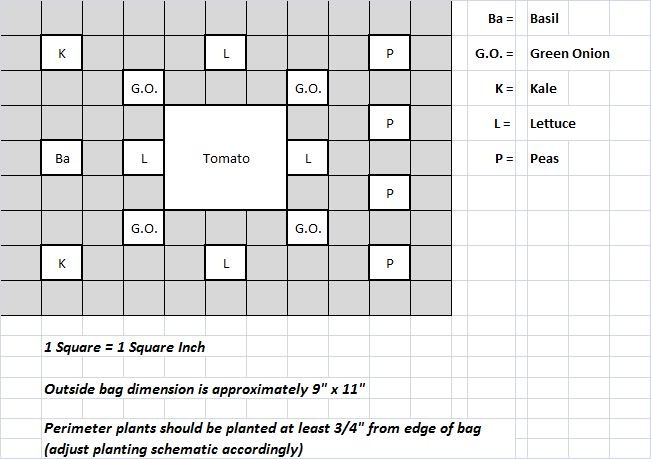
To give you an idea of how we will space the plants for Bag #2 here is a planting diagram.

Hope this helps! Feel free to post any follow-up questions or any other questions Andi - or anyone else :)

BTW - another way to get more information on what plants work well together is to google "companion plants"

Tuesday, May 11, 2010

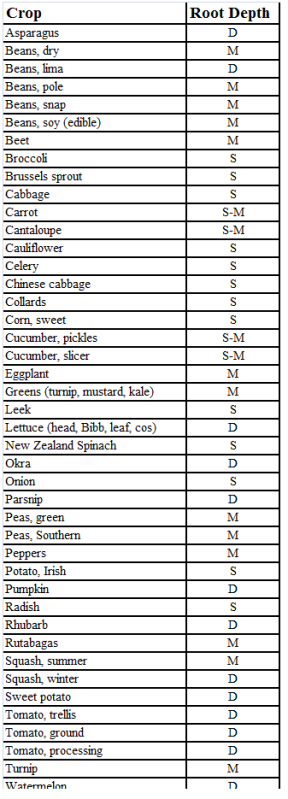
Plant Root Depth Chart

Here is a plant root depth chart for your planting ponderings. For additional information on planting see our planting post.

Miscellaneous Tidbits

- Holes in the bag let out excess water and let in air {two of our four essential elements from the 'So, what exactly is a Bucket Garden' overview}

- Cut off your spinach and cabbage and let it grow, if it bolts then it's done {see bottom of post for all you ever wanted to know about bolting}

- Don’t plant tomatoes and peppers near each other.

- If you’re planting leafy greens and it’s already hot, wait to plant them until you have a primary plant big enough to provide some shade and protection from the sun.

- Bags on the outside get hotter than those in the center. Melons are good for the outside bags, particularly the corners because they like heat.

- If you want to make RoundUp more effective when killing grass or weeds to create a place to put your Bucket Garden, mix 1 ounce of apple cider vinegar into one gallon of water, then add 1 ounce of RoundUp concentrate (not the premixed kind). However, don't use RoundUp in your Bucket Garden! You can easily pull out any weeds that may blow into the garden as seedlings.

- Peas can grow in the heat if they are shaded by other plants.

- The Garden Master recommends using something like the Jiffy-7 peat pellets to grow primary plants before transplanting them into the bags. With the Bucket Garden System you don’t need the plants to be very big before you transplant them. Smaller is better. Click
HERE to learn a little bit more about pellets.

- Basil needs some protection from the heat, so it is best to grow with an indeterminate tomato.

- A simple explanation of the difference between determinate and indeterminate tomatoes is that determinate tomatoes bear their crop all at once, while indeterminate tomatoes bear fruit over the course of a season. Indeterminate varieties tend to grow longer vines and will require more support in terms of staking or caging over the course of a season. Determinate varieties often (but not always) tend to be more compact and manageable. If you want a large crop of tomatoes all at once, you need a determinate tomato. To determine if a tomato plant is determinate you would look for two basic pieces of information in the plant catalog or on the plant label. Look for the word "determinate" or the abbreviation "DET" so you know what you're dealing with. Next, look for the number of days at which the plant will set fruit. To get several nice harvests, try to combine determinate varieties that bear early, mid, and late season crops. If you are into canning, saucing, or drying your tomatoes, this is probably the best way to go. If you want tomatoes for the course of the season for snacking and adding to salads and sandwiches, it is best to go with indeterminate varieties. Several types of indeterminate tomatoes are very prolific, and a plant or two will more than suffice to meet your needs. Many favorite heirloom tomatoes are indeterminate varieties. When shopping for your tomato plants, you will be looking for "indeterminate" on the label, or the abbreviation "IND" (or, less commonly, "INDET").

- A shade cloth can help protect plants from the intense heat of the summer.

Bolting:

Plants, mostly vegetable or herbs, are said to bolt when their growth goes rapidly from being mostly leaf based to being mostly flower and seed based.

Why do plants bolt?

Most plants bolt due to hot weather. When the ground temperature goes above a certain temperature, this flips a switch in the plant to produce flowers and seeds very rapidly and to abandon leaf growth almost completely.
Bolting is a survival mechanism in a plant. If the weather get to be above where the plant will survive, it will try to produce the next generation (seeds) as quickly as possible.

Some plants that are known for bolting are broccoli, cilantro, basil, cabbage and lettuce.

Can you eat a plant after it bolts?

Once a plant has fully bolted, the plant is normally inedible. The plant’s entire energy reserve is focused on producing the seeds, so the rest of the plant tends to become tough and woody as well as tasteless or even bitter.

Occasionally, if you catch a plant in the very early stages of bolting, you can temporarily reverse the process of bolting by snipping off the flowers and flower buds. In some plants, like basil, the plant will resume producing leaves and will stop bolting. In many plants though, such as broccoli and lettuce, this step only allows you some extra time to harvest the crop before it becomes inedible.

Preventing bolting

Bolting can be prevented by either planting the plant early in the spring so that it grows during the late spring or late in the summer so that it grows during early fall. You can also use shade to keep the plants cooler.

How do I use the Nutrient Spray?

Generally, once the plants are established you should spray their leaves once every three weeks. You shouldn’t harvest for three days after spraying because it affects the flavor of the produce. The nutrient is not toxic in anyway and contains fish emulsion, fish powder, sulfate of potash, powdered sugar, humic acid, sulfur, corn calcium, sea weed, kelp and yucca extract; it’s all good, that is so long as you don’t taste it {or smell it - blah!}. Read the Garden Master’s exact instructions on the nutrient application by clicking HERE.

Note: the nutrient can be purchased from the Garden Master for approximately $8 per bottle {one bottle should last about a year for a 4'x 8' garden}

Programming the Watering System

The watering system should be set up on its own timer separate from your other landscaping. The initial settings are 6 am, 12 pm, 2 pm, and 4 pm, and one minute of watering at each setting. As the season gets warmer, stick your finger in the sand a few minutes before watering time; it should be dry on top but moist down at the ¼ inch level. If it’s not moist, then you need to increase your watering time by one minute. If there is water leaking out of the holes of the bag after watering, you can decrease the cycle time by a minute. Fortunately, while you might end up wasting a little water, you can’t over water the garden because the excess escapes through the holes in the bag.

{Rain will not harm your garden, as mentioned above over watering cannot occur because excess water escapes through the holes in the bag}

Planting

Each of your garden bags will have a primary plant and 10 to 28 secondary plants surrounding it.

Primary plants quick list:

- Transplanted into the bag {starts that you either purchase or grow yourself from seed}
- Planted in the center of the bag {see exception below}
- Plant before secondary plants in the hotter months to provide benefits {such as shade} for secondary plants
- Will last all season
- They should be small when you plant them in the bag, large plants will go into "root shock", take longer to start growing, and cost more than small plants {if you choose to purchase them} - if you are purchasing starts you will want the six to eight packs
- Be very careful with the roots when planting - if they are wound down at the bottom they need to be gently separated
- Primaries should be well hydrated and sprayed with nutrient BEFORE transplanting {see Garden Master exact instructions below}
- Plant different primary plants in neighboring bags (i.e. plant a tomato primary next to a cucumber primary)

Secondary plants quick list:

- Grown from seeds in the bags
- Planted after primary plants
- Plants are harvested and then replanted
- Plants don't need to reach full size, pick them when they are small to save cutting time & they'll be more tender and flavorful

Exception {referenced above}:

- If your primary plants are beans or peas, 4 of them are planted in a row in the center of the bag

Garden Master exact instructions {referenced above}:

- Food preparation - mix 2 Tablespoons of nutrient with 1 gallon of water
1. Water thoroughly to ensure plant hydration. Do not feed plants if they are dehydrated(wilted).
2. Feed transplants 3 days prior to transplanting.
3. Feed transplants 3 days after transplanting if they have fully recovered from any transplant shock.
4. Feed every 3 weeks thereafter
- Application of nutrients/food
Apply nutrient solution in a fine mist to the top and underside of the plant foliage early in the mornings. NEVER EVER EVER apply the nutrient solution in the heat of the day or if the temperature is below 50 degrees F.

Other Planting Information:

Each bag is like a puzzle; you want to plant the produce that grows well together. Ted has put together a planting guide for
the month of April that is designed for commercial planting. To see his planting guide click
HERE. This planting guide will allow you to see which plants to group together but he hasn't had time to customize it for family gardening and so the spacing guidelines are not applicable. The planting guideline is not an all inclusive list of compantion plants. If you can't find companion plants you're looking for, search the internet and you'll find many similar companion planting guides you may use to supplement this list {if you find one you particularly like please do share by making a comment on this post with a link to your find}.

As you design your garden puzzle in each bag, think of the space each plant needs. You have space above the bag, shallow root space just below the surface of the sand, middle root space, and deep root space. For example, carrots are going to use a lot of shallow and middle root space but not much space above ground. A tomato plant will use a lot of space above ground, but its roots will grow deep and not use much shallow root space.

Here is a quick grouping of basic plants according to root space requirements.

Shallow root plants - beets, lettuce, onions, radishes, spinach, chard, cucumbers

Middle root plants - broccoli, cabbage, cauliflower, cherry tomatoes, eggplant, peas, peppers, carrots

Deep root plants - beans, potatoes, squash, tomatoes

The Garden Master has a diagram for planting - click
HERE. This planting scheme helps in space usage and trelissing. Plants that don't like each other should be planted at opposite ends of the garden. To avoid cross pollination problems, plants like cucumbers and melons should be planted away from each other.

The Bucket Garden is designed for continual harvest, which means you'll be able to have new organic goodness ready for picking every week. Because primary plants last all season, you can transplant them all at once through the entire garden. However, to avoid wasted produce, do not overplant too much of any one type of primary. As a general rule, once the primaries are transplanted and growing, plant 25% of your garden with secondary plants. Wait approximately two weeks, and then plant the next 25% of your secondaries. Wait another two weeks for the next 25%, and another two weeks for the final 25%. Staging the planting in this manner will create a continual harvest.

In your garden design you'll want to include plants that ward off enemy insects {the bad bugs} and others that encourage beneficial insects. Plants that repel bad insects and invite beneficial insects include the following: garlic, chives, coriander/cilantro, onion, petunia, geranium, marigold, nasturtium, basil, sage, and chrysanthemums. For more information, until the Garden Master provides additional content on his website, click
HERE for details on beneficial insects and the plants they like. The Garden Master also recommends mixing a few radishes and onions in with your carrot crop to discourage insects that attack carrot roots.

Basic plant spacing guidelines:

Spacing is not an exact science, it just requires the application of common sense. For example, you can't grow 20 tomato plants in one bag - but you could grow the following: 1 tomato, 1 basil, 4 lettuce, 5 radish, 15 carrot, and 4 green onion. This arrangement would give you 30 plants in one bag. The tomato would be your primary plant, basil and lettuce would serve as your larger secondary plants, and radishes, carrots, and onions are all small secondary plants. The amount you plant of each will vary based on your family's needs.

To assist you in spacing, imagine a 2 inch grid covering your bag. As a general rule, you can place one plant every two inches. Your bigger plants {primaries and larger secondaries} will need a little more space. Plants like onions can be planted every one inch.

Phew - lot's of information. Remember, your Bucket Garden is your puzzle and you have complete control over how you decide to plant it and how much fun you have in the process.